Here is how to do it:
1) Close all instances of Visual Studio except leave one instance open.
2) Right-click anywhere in the toolbar and choose "Customize" at the bottom of the menu.
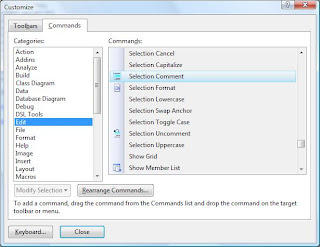
3) You will then see the "Customize" Dialog Box. Select the "Commands" tab.

4) To remove a command from your current toolbar simply click on the icon in your current toolbar and drag it onto the "Customize" Dialog Box. Go ahead, be adventurous and get rid of cut, copy and paste forever. You can remove unused menu items as well as generally rearrange the position of items by simply dragging them to your desired location.
5) To add a new item to the toolbar simply find the item within the "Customize" dialog box's list of commands and drag it into the desired position in your toolbar. You can even drag the item into menus if you desire. For example, in this screenshot I am ready to drag the "Selection Comment" button onto the toolbar.
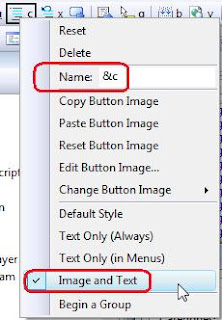
6) This step is the productivity booster. Once you have all of your items just where you want them you can assign custom shortcut keys to them. With the "Customize" dialog box still open, select an item in your toolbar and right-click on it. Now you can alter its "name" to be anything you want. In this example I changed the name of the "Selection Comment" button to "&c". Using the ampersand before the letter "c" allows me to click this button by typing alt+c while I am programming. Occassionally, when you do too much customization you will create shortcut conflicts. For example, in my setup I have added a build button to my toolbar and changed its caption to "&b". This conflicts with the fact that the "Build" menu also has &B assigned as a shortcut. The solution is to right click on the "Build" menu option and remove the "&" from the beginning of the name.

7) You can even add buttons to the toolbar to execute any macros you may have written. Just select "Macros" in the "Categories" list on the left.
8) Close the "Customize" dialog box.
9) Share this tip with your friends.
Be Safe, It's a Jungle Out There...

No comments:
Post a Comment